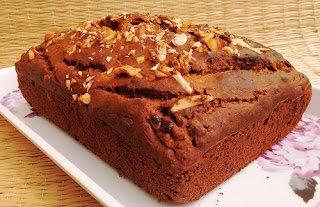
Sweet Milk Bread
 |
| Sweet Milk Bread |
I absolutely love how my home smells like a bakery. And when
your attempt to bake a bread succeeds, it is just pure bliss. This one was a
mid-night bake. Watching the dough rise, punching it down, shaping a loaf,
seeing it rise and then finally baking it – pure magic I tell you.
Recipe
INGREDIENTS
2 and 1/2 cups All purpose flour
1/2 cup Sugar
1 and 1/2 tsps Instant dry yeast
1/4 cup Milk
1/8 cup Milk Powder
1/2 tsp Salt
1/8 cup Olive oil
2 tbsps Tutti frutti
3/4 cup Warm water
** Milk and flour for brushing the loaf, dusting the surface
INSTRUCTIONS
- Measure and keep all the ingredients ready.
- Sift the flour [ 2 and 1/2 cups], milk powder and salt together.
- Activating the yeast - mix the yeast, 1 tsp of sugar and 1/4 cup of warm water. Set aside for 10 minutes, until the mixture turns frothy and releases a fruity alcoholic smell.
- In a large bowl mix the remaining sugar, warm water and milk [1/4 cup].
- Add the frothy yeast and mix.
- Add the sifted flour 1/2 cup at a time and mix using a silicon/ wooden spatula.
- Mix uniformly in a clockwise circular motion. The dough initially appears pretty sticky.
- Add the olive oil, 1 tsp at a time and continue mixing/ kneading with the spatula [ I dint use my hands initially to avoid the sticky mess].
- Knead until the dough turns elastic and non- sticky [ see if it stretches].
- Grease a large bowl and roll the dough in it to coat its surface evenly.
- Cover the bowl with a damp cloth and keep in a warm place, undisturbed, until the dough doubles in size. Roughly about 1 and 1/2 to 2 hours. [ this might take a bit longer because of the higher sugar content].
- Gently deflate the dough.
- Transfer it to a lightly floured surface and gently pat it into a rectangle, whose length is slightly less than your loaf tin. [ Greasing your hands or dusting it with flour would make this task easier].
- Sprinkle the tutti fruity and press it down a bit.
- Roll into a log and pinch the ends to seal.
- Place in a greased and lined loaf tin with the seam side down [ this recipe yields a small loaf].
- Cover with the damp cloth and allow to double once again [ about an hour or so]. It should rise till the rim of the loaf.
- Preheat the oven at 180 C for 10 minutes.
- Brush the top of the dough with milk.
- Place on the lower rack and bake at 180 C for about 40 minutes. If your top starts to brown soon, tent it with aluminium foil. I saw mine a little late, so it appears a little too brown. If you cover it early the top would be a lovely shade of golden brown, just like the sides.
- Remove from oven and wait for about five minutes before turning the tin upside down and getting your loaf out.
- Allow to cool completely [ for a couple of hours] before slicing.
RECIPE NOTES
- The dough should be kneaded gently and until the time it turns non- sticky and elastic. I did this in a large glass bowl and used a wooden and silicon spatula to handle the dough in the beginning.
- One thing that worked well for this bread is the right quantity of yeast. I always ended up adding a bit too much, thinking that the bread would rise better. But the result would never be satisfactory and the bread would smell yeasty.
- The water used must be just warm. Neither hot nor cold. This is important for the yeast to get started off.
- I used instant dry yeast which can actually be added directly to the dough. But I find this way much better. If you are using dry active yeast, follow the same steps.
- It is very important for the yeast mixture to turn frothy. If it doesn't discard the mixture and start afresh. I would suggest using a good quality instant yeast. It works the best.
- The higher sugar content slows down the yeast. Do be patient for the dough to double up, even if it takes longer than specified./
- Bread baking also depends on the weather, humidity etc. A little bit of trial and error may be needed to get it right. But I am sure you will enjoy this just like me.
Happy baking.
Posted originally on JANUARY 20, 2016


Comments
Post a Comment