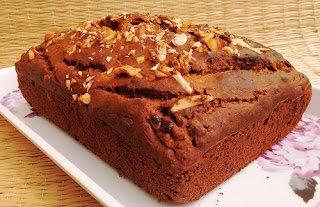
White Bread | My first bread loaf
 |
| White bread loaf |
The first ever bread I baked- Simple basic white bread loaf.
I just realised, I never got down to putting it on the blog.
This is one recipe I never tire off. The result is amazing every
single time and I feel super happy with myself. Today I made this specially for
my granny.
The recipe is adapted from Sumod Tom’s Blog.
Recipe
Prep Time 120
minutes
Cook Time 45
minutes
Servings 1 loaf
INGREDIENTS
2 and 1/2 cups All purpose flour
1/8 cup Milk powder
1 tsp Salt
2 tsps Sugar
2 tbsps Olive oil
1 and 1/2 tsps Instant dry yeast
1 cup water Warm
Milk for brushing
INSTRUCTIONS
- Sift the flour, milk powder and salt together. Set aside.
- Yeast activation- Mix the yeast with 1 tsp of sugar and 1/4 cup of warm water. Set aside for 10-15 minutes, until the mixture gets frothy.
- In a large glass bowl mix the remaining 3/4 cup of warm water and 1 tsp of sugar.
- Add the frothy yeast and give it a mix.
- Add the sifted flour and use a spatula to bring it all together. [ it may be a little sticky at this point, don't worry about that]
- Cover the bowl with a lid and allow to rest for 10 minutes.
- After 10 minutes, add the olive oil [a little at a time] and start to knead the dough gently, until it turns smooth and elastic. [ don't over knead and do be gentle]
- Grease a large bowl and place the loose ball of kneaded dough in it. Grease the top of the dough too.
- Cover the bowl with a damp cloth and keep in a warm place for the first proofing [ doubling of the dough]. It took mine about 45 minutes.
- Keep a greased and lined loaf tin ready. [ This recipe makes a small loaf. I used a 7.5 inch by 3.5 inch loaf tin].
- Deflate or punch down the dough gently. Knead it for a couple of minutes.
- Place the dough on a lightly floured surface and pat into a rectangle [whose length is slightly lesser than the loaf tin you are using].
- Roll it gently, into a loaf and seal the edges together by pinching the dough.
- Place in the prepared tin, seam side facing down.
- Cover with a damp cloth and set aside for the dough to bloom for the second time. [ It took about 1/2 an hour for me. Do keep an eye, since over proofing will effect the final texture of the bread].
- When the dough is almost doubled, preheat the oven at 180 C for 10 minutes.
- Brush the top with milk and bake at 170-180 C for 45 minutes. Keep an eye on the top of the loaf. Tent it with aluminium foil if it starts to brown early. I covered mine after 20 minutes of baking.
- Remove from the oven and transfer to a wire rack to cool completely. [ about an hour or two atleast]
- Slice once completely cooled.

RECIPE NOTES
- This is a fairly simple recipe. All you need is some good quality yeast. I find that instant yeast gives great results. In case you are using active dry yeast, please see that the yeast mix turns 'frothy' in about 15 minutes. If not, you will have to discard it and restart.
- The water used must be warm enough for you to comfortably put your finger in. Hot water will kill the yeast. And it won't get activated if the water is cold.
- Though instant yeast can be directly added to the flour, I follow the above steps. If you choose to add it directly to flour, please make sure it doesn't come in direct contact with salt.
- I bake my breads on the lower rack at the bake mode [only lower heating coil is switched on]. It works best for me. Do note oven temperature and time may vary.
- Removing the baked bread from the tin immediately after baking is important, otherwise the base would get soggy.
- Slice only after the bread has cooled completely [ however much you are tempted]. Your patience will be rewarded with gorgeously neat slices of bread.
Happy baking
Posted originally on FEBRUARY 17, 2016

Comments
Post a Comment